Monday, February 28, 2011

Cheesy Shells and Broccoli

I stumbled upon the blog Budget Bytes a few days ago. Good (healthy) food + inexpensive ingredients = right up my alley. I really want to try her recipe for chocolate lava cakes but I need to cut back on my sugar intake (I just polished off a pan of frosted brownies in under 24 hours). Anyway, this pasta looked too good and too easy to pass up and I'm glad I didn't. It was hit. I made a couple changes, nothing major though.

8 oz. pasta
1 large broccoli crown, cut into small florets
1/2 cup chopped onion (I used shallots because I had a few floating around that I wanted to use up)
3 Tbsp butter
3 Tbsp flour
2 1/2 cups milk (I used plain almond milk and the sauce turned out just fine)
2 cups grated cheddar cheese
1/4 cup Parmesan
Salt and Pepper
Tabasco

Add pasta to a large pot of boiling water. After the pasta has been cooking for 8 minutes add the broccoli to the same pot. Cook for two minutes more. Strain pasta and broccoli and pour back into large pot.

In a medium saucepan over medium heat melt the butter and saute the onions until translucent, 2-3 minutes. Add the flour. Using a whisk, stir and cook the flour mixture for 2 minutes. Add the milk and whisk to dissolve any clumps. Add fresh ground pepper. Allow mixture to simmer and sauce to thicken. Once sauce has thickened, stir in cheeses until fully melted. Add a splash of Tabasco and salt if desired. Pour cheese sauce over pasta and stir until pasta and broccoli are well coated.


Again, this is not a great picture. Husband is on swing shift so I'm flying solo during dinner time, which means I'm like a crazy woman in the kitchen between the hours of 4:30 - 7. Excuses, excuses, I know.

Review - Everyone loved this pasta dish. I loved it so much that I had seconds after the kids were in bed. I mixed three different kinds of cheese (cheddar, Parmesan, and some Cougar Gold). I think you could definitely play around with different cheeses, just make sure you have at least two cups. I only added a couple drops of Tabasco, which kept it mild enough for the kids. I served it with peas. I'll definitely be making this again.

Friday, February 25, 2011

Mexican Polenta Scramble

Who knew a "scramble" didn't need to contain eggs? I learn something new everyday. This has become a staple in our house. I found the recipe about nine months ago and have made it at least once a month since. It goes together really quickly, especially if you buy the premade polenta. I've made my own polenta before, it's not hard, but it is a little time consuming because you have to constantly stir it.

1 tablespoon extra-virgin olive oil
4 poblanos or 2 green bell peppers, diced (I've only used bell peppers because the poblanos at the store are always mushy)
1 pint cherry tomatoes, halved
2 teaspoons ground cumin
1/4 teaspoon salt
1 16-ounce tube prepared plain polenta, cut into 1/2-inch slices
1 bunch green onions, sliced
1 cup shredded reduced-fat Cheddar cheese, preferably sharp
1/4 cup chopped fresh cilantro
1 tablespoon lime juice
1 avocado, diced

Heat oil in a large nonstick skillet over medium-high heat. Add peppers and cook, stirring occasionally, until bright green and just starting to soften, about 3 minutes. Stir in tomatoes, cumin and salt; cook, stirring often, until the tomatoes start to break down, 2 to 3 minutes. Crumble polenta slices into the pan and cook, stirring occasionally, until heated through, 1 to 2 minutes. Stir in scallions, cheese, cilantro and lime juice. Serve the scramble topped with diced avocado.


Sorry this is not the best picture. I was in a hurry to a) eat b) calm the screaming children c) get dinner over with so I could sit down and enjoy a piece of dark chocolate in silence (it was one of those days). 
Review - As long as I don't overdo it with the peppers, everyone likes this dish. The flavor is mild enough for the kids, but not boring for the adults. If you wanted to make this spicier you could add some chopped jalapenos or chili powder.


Monday, February 21, 2011

Caramelized Onion Pasta

I discovered the "Sauces and Dips" chapter of my Moosewood cookbook. I found at least four sauces that I wanted to try, but this recipe won for this week. I'm not really sure how this qualifies as a sauce, but it was good so I don't really care what they call it.

1/2 cup olive oil
4-6 large onions, thinly sliced
1/2 tsp Kosher salt
1/2 to 1 cup dry white wine
1 medium bunch arugula or spinach, chopped (I used a couple handfuls of spinach)
1 cup crumbled feta
3/4 lb. pasta
toasted walnuts, grated parmesan (optional)

1. Heat olive oil in a large skillet. Add onions and saute over medium heat for about 15 minutes. Add salt and continue to cook for at least another 10 minutes, up to an hour, the longer the better. Add wine to deglaze the pan. Simmer, uncovered for 15 minutes.

2. Cook pasta. While the pasta is cooking, add the chopped greens too the onions and cook for 5 minutes. Stir in the crumbled cheese and turn heat to low.

3. Drain pasta and add to onion mixture. Sprinkle walnuts and parmesan cheese on top before serving.

Caramelized onions are delicious. It takes a little time to cook them, but it's well worth the effort. You can do the onions ahead of time and set them aside. I left mine covered on the stove for a few hours before dinner.

Just gettin' going
This is after about 20 minutes over medium-high heat
40 minutes and just about done.
Review - This was a really simple, but flavorful dish. Three out of the four of us liked it. My sweet little girl child is becoming quite the food critic. Apparently she doesn't need to even taste the food before she decides she doesn't like it. She took one look at this and requested tortellini, which she would eat every night if I let her. I'm not giving up. As long as one kid eats it I'm considering it a keeper. The only change I might make next time is to choose a different cheese. I thought the feta took away from the onions a little, so I might try something a little more mild or leave it out altogether.

Sunday, February 13, 2011

Roasted Eggplant Lasagna

I've been on an eggplant kick lately. I've been trying to come up with ways to use that beautiful purple-skinned vegetable to replace meat in some of my favorite Italian dishes. I've made a couple vegetarian lasagnas in the past, but they've always just been so-so. In rolls the eggplant...

Most of the eggplant lasagna recipes that I found used eggplant in place of noodles. I didn't want to give up my noodles. I like my carbs, thank you. I made this recipe up, so again, the measurements are going to be slightly approximated. 

I only had one eggplant in the fridge. If you are going to make a 9x13 of lasagna and you want more than one layer of eggplant, you're going to need at least 2 medium-large eggplants. I had to throw in a layer of spinach because I only had enough eggplant to cover one layer and lasagna just isn't lasagna without multiple layers. 

2 medium/large eggplants, sliced lengthwise 1/4" thick
kosher salt
olive oil
2-3 shallots, chopped
15 oz. ricotta
2 eggs, slightly beaten
salt and pepper
1 tsp. oregano
10-12 uncooked lasagna noodles
24 oz jar of pasta sauce (I used Newman's Own Sockarooni)
2 cups shredded mozzarella
1/2 cup freshly grated parmesan

Preheat broiler. Sprinkle salt on both sides of sliced eggplant and place in strainer and allow to drain over sink for 30 minutes. Rinse under cold water and pat dry with paper towels. Place eggplant on a baking sheet, brush both sides with olive oil. Broil for 10-20 minutes, turning once halfway through, or until eggplant begins to brown slightly. Remove from oven and set aside.

Preheat oven to 375.

Mix together shallots, ricotta, eggs, salt, pepper, and oregano. Spread a thin layer of tomato sauce in the bottom of a 9x13 pan. Place a layer of uncooked noodles on top of the sauce. Next add a layer of ricotta mixture, followed by a layer of eggplant, then tomato sauce, and finish with mozzarella cheese. Repeat. Noodles, ricotta, eggplant, tomato sauce, cheese. I had quite a bit of sauce left so I added another layer of noodles, sauce and cheese. Sprinkle grated parmesan on top. Cover with foil and bake for 45 minutes. Remove foil and bake for another 15 minutes or until cheese is fully melted and bubbly. 

Review - I really liked this dish. This was the first vegetarian lasagna that I didn't find myself longing for some Italian sausage after the first bite. I would serve this to company if we ever actually had people over. Jay ate two servings. Eli did pretty well, but didn't want to pick it up with his hands, so I had to feed him. No big deal. When I set the plate down in front of Josie her response was, "Gross!" We quickly had a little lesson on table etiquette. In the end she ate most of her serving, along with salad and bread. I could tell the kids weren't as excited about this dish as I was, but they ate it, so I was happy.

Tuesday, February 8, 2011

Oven Roasted Parsnips

I've come to realize that a lot of people don't know what parsnips are or how to cook them. I actually only learned what they were a few years ago. I had a very kind coworker give me a bag of homegrown parsnips (and a bag of trout, but that's another story) with the instruction "Roast them." So I did. And they were delicious. 

These are parsnips. Unwashed and unpeeled.

Washed, peeled, and cut lengthwise into sticks
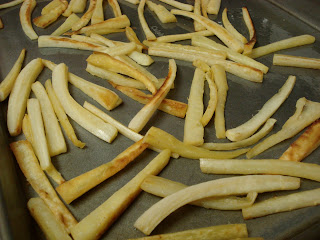
Finished product
Preheat oven to 400. Wash, peel and cut up parsnips. Place parsnips in plastic ziploc bag or plastic container with a lid. Drizzle with olive oil. Shake until parsnips are well coated. Place parsnips on a baking sheet in a single layer. Sprinkle with kosher salt. Bake for 20 minutes or until parsnips begin to turn golden brown, turning once halfway through.
This picture was stuck in between my parsnip pictures. Three year old got ahold of my camera.
Review - We really enjoy this side dish. Josie (3) loves them. We used parsnips as a bargaining tool to get her to eat her salmon, a bite of salmon for another parsnip. It worked. Parsnips are really sweet and would also roast well with potatoes and carrots.

Saturday, February 5, 2011

16 Bean Soup

Prior to making this soup, I didn't even know those bags of 16 Bean Soup Mix existed. I've never noticed them in the bean section in the store. I have a vague memory of a 5th grade art project that used an assortment of beans that resembled the 16 Bean Mix. I believe I made a butterfly out of beans. 

On to the soup.

I kept this soup very mild so that the kids would eat it. Jay and I both doctored up the final product. If you like spicy soup you can add more chili powder or red pepper flakes. You could also add more vegetables if that makes you happy.

1 bag 16 Bean Soup Mix, soak beans overnight, drain and rinse (throw away the seasoning packet, it's full of stuff you shouldn't be eating)
1 onion, chopped
1 14.5oz can fire roasted tomatoes with garlic, with juice
1 Tbsp cumin
1-2 tsp chili powder
1-2 quarts vegetable stock
3-4 cloves garlic, crushed
Salt and pepper
Grated cheese to garnish

Add beans, onion, tomatoes, spices and vegetable stock to slow cooker.  If you want a thicker soup add just enough stock to cover beans. If you want a soupier soup add the second quart. I don't know how much stock I added because I used the vegetable stock that I made the night before and it was already in the slow cooker. I'm guessing it was a little under 2 quarts. Cook on low for 8-10 hours. Check the beans around 7 hours. Add garlic. Adding the garlic at the end of the cooking process yields a stronger garlic flavor than if you added it in the beginning. I'm pretty sure I read that somewhere. However, it's very possible that I'm making it up. Eh, I'm going with it either way. Continue cooking until beans are soft. Season with salt and pepper before serving. Top with grated cheese of your choice. We used grated Parmesan the first night and pepperjack cheese the second.

When I checked my soup at 7 hours it was too soupy so I added 1/2 cup of uncooked barley to thicken it up. I turned the slow cooker up to high and let it cook for another hour. You could also use rice or quinoa.
Review - This soup was perfect last week because we've been snowed in. Snowed in...in Texas. The temperature has been in the single digits. It's been downright nasty outside. I felt like I'd been teleported back home to Washington. Whether in Texas or Washington or Michigan, cold weather means soup weather. We all enjoyed this soup. You know Eli loved it with the beans and all. He did better with the big beans because they were easier to pick up with his chubby little fingers. Josie needed a little coaxing, but she ate it. I served it with a salad. This fed us for two days and lunch for me on the third day.

Friday, February 4, 2011

Falafel with Tzatziki and Hummus

I discovered falafel about 6 months ago. I'm hooked. I could eat this every week, easily. The leftovers, if there are any, reheat well so it makes an excellent lunch the next day. I started with this recipe and have tweaked it to my liking. There are boxed falafel mixes available in the grocery store. I tried one. Once. Never again. I'm sure there are some that are better than others, but the one I tried was bland and mushy and didn't hold a candle to this recipe. It's worth the extra effort to make it from scratch, but isn't that true of everything?

1 (15 ounce) can chickpeas, drained
1 onion, chopped
1/2 cup fresh parsley
2-3 cloves garlic, chopped
1 egg
2 teaspoons ground cumin
1 teaspoon salt
1 dash pepper
1 pinch cayenne pepper
1 teaspoon lemon juice
1 teaspoon baking powder
1 tablespoon olive oil
1 cup dry bread crumbs
  
Place onion, parsley, and garlic in food processor and blend until finely chopped. Add chickpeas and pulse until everything is blended together. Don't blend too much or the consistency of the chickpeas will be too thin. Transfer into a large bowl. Add egg, cumin, salt, pepper, cayenne, lemon juice, baking powder and olive oil. Mix together. Add bread crumbs a little at a time until mixture will hold together.  Form into small patties. I like to make them smaller, so I usually make around 12-15.

Heat olive oil in large skillet. Fry the falafel until brown on both sides. Transfer to plate lined with paper towel. Serve in pita pockets with spinach, feta, tomatoes, hummus and tzatziki sauce (recipes to follow). 

When making hummus and tzatziki I don't measure. I just taste frequently.  Tzatziki is traditionally made with cucumber. I don't really like cucumber, so we never have any in the house, so I always leave it out. I think it tastes just fine without it. If you need measurements,  there are lots of recipes out there that will give you exact measurements of both of these spreads. I'm only going to give approximations. Sorry.

Hummus 
1 can of chickpeas, drained, liquid reserved
1-2 Tbsp tahini
Several cloves of garlic
Lemon juice
Parsley
Salt
Paprika  

Blend everything in food processor, which is already dirty from making falafel, don't worry about cleaning it, you're basically using the same ingredients. Add the liquid from the chickpeas until desired consistency is reached.  

Tzatziki 
8 oz. plain yogurt
1-3 cloves of garlic, crushed
Salt
Pepper
Dill
Lemon juice 

Mix everything together in a bowl. Cover and let chill in refrigerator for an hour. The garlic will become more potent the longer it sits, so beware. If you'd like a thicker spread you can strain the yogurt first or just buy Greek yogurt, which is thicker, creamier and heavenly. 

The falael is in there, I promise, it's just buried.

In case you were wondering what it looks like after a couple bites
Review - Jay and I love everything about this dish. Josie likes it most of the time. Sometimes I can only get her to eat a pita with hummus and spinach, but hey, that's something at least. Eli only ate the pita and hummus this week. I think it might have been garlic overload for him. It adds up quick between the falafel and the two sauces. I can easily use a whole head of garlic for the three. Did I mention we are garlic fiends in this house?